Showing posts with label indian beauty blog. Show all posts

Monday, September 11, 2017

Date-Night Makeup Tutorial (Simple & Step-by-Step)

Hi Everyone,

Being parents to a very active 5yr old, we don't usually get to have date-nights. Either the kiddo tags along or we order-in & spend chilled out evenings at home.

So when the Husband & I realized that he has to leave for a tour on my birthday this month, we thought of going out to dinner. We called it an "Early Birthday Dinner + Date-Night". Since these evenings out are a rarity in my case, I thought of trying to put in a lil extra effort into my makeup look. It turned out really well & I was very pleased with it. It's actually very simple & with little practice, you could put this together in about 10mins flat.

Here's how I put it together -

1. Apply deep black kajal on the entire moving eyelid. Don't go above the crease though. Smudge out the kajal with a brush or your finger. This forms a nice base for the eyeshadows that follow. They'll stick on & last longer. If you're a beginner, I strongly suggest staying away from deep blacks & using a deep brown as they're more forgiving & easier to blend.

2. Apply a grey eyeshadow on the inner & outer corner of the eyelid. On the middle, dab a shimmery eyeshadow (I used a shimmery gold) with your finger. Blend the edges of 3 segments, to make it look gradient. So, they should look something like this - Grey-Gold-Grey lol I'm so sorry I'm really bad at describing this process.

The Gold in the centre of the eyelid, makes the eyes pop & looks beautiful. 

3. On the crease of the eye, you can blend in a deep brown or any earthy toned eyeshadow to deepen it. This will ensure an overall blended look. Tie-in the look by lining the lower lashline with the same deep black kajal & smudging it with a brown or black eyeshadow. 

So here's how the eye look turned out -


For this look, I used the New-trals Vs Neutrals palette by Makeup Revolution London. You could use any palette or single eyeshadows you own. You can also switch up the colours, while keeping the same technique to create a "Spotlight Effect" :-)

On another random note, I've been away for about 2 months now & it feels great to be blogging again. Hope you liked this simple tutorial I put together. I write at nights when my lil one's asleep & I do so on my phone. With his school schedule & everything else, the post takes sometime to make an appearance on the blog hehe, completely my fault...Guilty as charged!! 

Leave in requests for other posts & I'll be happy to come up with them!

See you all around soon! Ciao!

Monday, January 23, 2017

Lakme 9 to 5 Crease-less Lipstick - Wine Order (Review)

Hi Everyone,

WINE ORDER ... the name itself makes this Lipstick-Junkie, slightly woozy ;-) Ahem ahem.. let's get back to the review now, shall we? 

Price : The lipstick is priced at Rs. 450/- but you can always get online discounts.

Shade : Wine Order is a deep, rich pinkish-wine shade. It's definitely suitable for all Indian skin tones. Some of my friends tell me, they prefer this shade only for evenings, but I mostly like wearing it during the day.

Left - under artifical light; Right - in natural light
Texture / Formula : I love the texture of the Lakme crease-less range. The lipstick glides on smoothly & does not tug at the lips. The formula is Semi-matte and sits well. It's smooth & creamy in a way that it hydrates the lips & doesn't accentuate the creases. However,  it DOES NOT really give a "Crease-less" look to the lips as it claims.

Pigmentation : Great pigmentation on this one! One swipe and you get amazing colour-payoff.

Wear-time : This lipstick looses points from me, on wear time. It lasts on me, for approximately 1 - 2hrs only. I've never been a fan of creamy or satin finishes for this reason. I don't like more than 1 or 2 touch-ups and this baby needs a lot of re-work to be done on it during the course of the day :-( Wine Order isn't transfer-proof and I see lots of it on my Coffee mug, my lil one's cheeks and all the Snacks I might have had. Basically it transfers Big Time on anything & everything!!

Overall Experience : I have absolutely loved the shade & my current lipstick tube is my 2nd in this particular shade. I've gifted it to friends and family who have loved it as well. It's a beautiful shade that would suit mostly all the Indian skin tones.
So overall, I'm so taken in by the shade that I have repurchased this & also overlooked the fact that it transfers a lot. This is one of the few "non matte" lipsticks that have made the cut to this matte-favouring Lipztickaholic's collection :-) If you're like me, you're totally going to love this lipstick! 

By the way, have you ever stepped out of your comfort zone for a product & ended up loving it? Let me know in the comments section below. 

Until the next post, Ciao..!!


Tuesday, August 16, 2016

Loreal Silkissime Liner in Purple Punch - Eye Makeup Look

Hi Everyone! 

I've been guilty of drafting this post and not really completing it for such a long time now. I just had to sit down and do it today.. lol I'm sure I wouldn't have been able to sleep if I didn't ;-) 

I have followed Shikha (from dressnmakeup) on Instagram for over a year now and I adore her profile. I won the Loreal Silkissime liner in Purple Punch in Shikha's giveaway and have been itching to use it in a makeup look. I created this makeup look some time ago for an evening out with friends. 


Step 1 - Apply your favourite eyeshadow primer. A primer will help your eye makeup stay for a longer time without creasing. Dust a flesh-toned eyeshadow shade all over the eyelids and all the way up to your eyebrows. This will set the primer and brighten the area for more colour. 

Step 2 - Apply the Purple liner on the upper lashline. Don't worry about being perfect like you would be with a liquid liner; just apply it right above the lashes. With a pencil brush / smudger brush, smudge the purple liner. 


Step 3 - Take a light brown eyeshadow and apply it over your crease area to deepen it. Let it blend in well with the purple that's below it. You can always reapply the purple later to make it stand out. 

Step 4 - (Optional) Line the lower lashline with kajal to add some definition to your eyes. I usually do this step when I'm using a bold colour on the eyelid. You can skip this if you like.

There you go!! Your ''Purple Eye Look'' with the Loreal Silkissime Liner is ready..!!


Bonus tips - Here are some other ways I like to use this gorgeous purple liner ...

1. Use the Loreal Silkissime Liner on upper or lower lashline. I skip kajal when I do this to make the liner colour stand out.
2. Use it for a sumdged-out look, like I've done in the above look. To define my eyes better, I like to use kajal when I do this.
3. Use the shade as an eye shadow all over your eyelid for a more dramatic evening look.


Use any colour of your choice & get creative! Always remember to have fun with Makeup!!! If you liked this post, leave me a comment below showing me some love :-) Also tell me what's your ''go-to'' look for the eyes. It could be a simple, elegant black kohl or an all-out, glamourous winged liner but I'd still love to know about it...

Until the next post, Ciao..!!


Thursday, July 28, 2016

Garnier Ultra Blends Shampoo - Mythic Olive

Hi Everyone,

I've always shared reviews of products that I've really liked, on my blog. But Blogging for me isn't only about sharing information about products I like; I feel that if there's something that I've tried several times and still hasn't worked for me, it's got to come up on the blog too, so that you all can make an informed decision.

I'm here today to share my views on the new Garnier Ultra Blends Shampoo in Mythic Olive. **spoiler alert** I don't like this one.. and I mean AT ALL... :-( Read on to know why.


Let's first see what made me pick this one up - 
  • Scent - It's got a lovely, olive-ey fragrance to it, which made me get this variant in this first place.
  • Beautiful packaging - Great job on the packaging. In fact, all the variants in this range have an attractive packaging that is very different from each other.
  • Price point - ₹120 . The budget-product junkie in me did a lil dance in the aisle.
  • Product claim - Since it said that the shampoo was for dry & under-nourished hair, I was more intriguied. It said that it could make the hair silkier and smoother. I thought wow! sounds great for my kinda hair.
  • Paraben Free & has Natural Extracts - I was really happy to know that the product was paraben-free. That sealed the deal for me & the shampoo successfully made it's way into the shopping cart.

Here's why I can't get myself to like it inspite of using it for over 5 washes now -
  • Makes hair extremely dry and frizzy - BBBIGGG turn-off!! I can actually feel my hair getting extremely dry and tangled during the wash, yes you heard it right...DURING the wash. I dunno if I got a bad batch product, or it's just my hair but I have other shampoos doing at least 50% of what they claimed in terms of smoothening & softening...certainly didn't expect this one to do the complete opposite. :-( I wanna cry now...!!
  • The more I kept it on my hair during the wash, the more dry and brittle my hair became. After the 1st wash I thought, maybe I need to keep it for a couple of mins more. Dry Hair. I thought maybe I need to reduce the time, so I tried that. Dry Hair. By the 4th wash, I dreaded the product but still went for it cuz you know... 120 bucks man! lol


Here I have to confess that I haven't picked up the conditioner in this Olive variant. I'm not sure if they have one because I didn't see one on the shelves that day. Also, generally, I don't have the time for a conditioner, every time I shampoo. The conditioning bit happens every now and then, but not always. Yes, of course it is a ''bad beauty habit'' I have :-( but don't tell me there aren't others like me :-P

In the end, I ended up feeling like I HAVE TO buy the conditioner to get the best use out of this shampoo... which is very silly. Shouldn't the shampoo be cleansing & slightly nourishing on the hair, by itself? Anyway, I'm planning to pick up the conditioner soon, cuz without it, I do not... I repeat... DO NOT see myself using this product again. So basically, to salvage the money I spent on buying this, I have spend some more :-( Not recommending this to anyone!! Okay I gotta go cry some more... :-P

Have you tried out the Garnier Ultra Blends Shampoo in Mythic Olive? How was your experience? Let me know your thoughts on it, in the comments section below.

Until the next post folks, Ciao..!!


Tuesday, July 19, 2016

One-Toned Makeup Look (Ideal for Workplace)

Hi Everyone,

Feels so good to reconnect with everyone through my lil blog! Yes, I have been away but that hasn't kept me far from my makeup & most importantly - playing around with it & creating different looks. One such look struck me as something I should share with everyone who likes minimalistic makeup. This look is ideal for your workplace but can be worn anywhere you like.

Here's my take on a One-Toned Makeup Look -


Base Makeup - Cleanse and prep your skin with moisturiser. I skipped foundation & went straight for concealer in this one. I used the Derma Color Concealer in the shade DFD to cover up the under-eye dark circles, blemishes & any other pigmentation on my skin. To set the base, I used my all time favourite compact, the Rimmel London Stay Matte powder in the shade 005 Silky Beige.

Eyes - Once the base was done, I moved on to the eyes. I stuck to earthy brown tones overall, in this look but you can choose the tone you want. The same makeup done is muted coral tones would also look great... Let me know if you want to see a post on that, in the comments below. For the eyes, I used two tones of brown - one lighter & the other slightly darker from the Wet n Wild ColorIcon Eyeshadow palette in "Comfort Zone". I used the lighter shade on the eyelid concentrating more on the inner half. I ditched the eyeshadow brush & dabbed the darker brown with my ring finger on the outer part of the eyelid. Then, using the same eyeshadow brush that I used before, I blended these two shades together. The lighter brown will bring some light on to the eyes, while the dark shade on the outer part will bring depth & definition to the crease.

To keep the eyes subtle, I skipped eyeliner & lined the lower lashline with my all time favourite kohl Lotus Herbal ColorKick Kajal. If you wish to see a close-up of the eye makeup, you can check it out HERE on my Instagram profile.

Products Used
Blush (Bronzer) & Lipstick - I skipped my usual blush for a bronzer this time as I wanted to maintain the earthy tone in this look. I used the bronzer from my ELF Blush-Bronzer Duo. For lipstick I used the Mauve1 shade from the Maybelline Lip Gradation range. I am so sorry I don't have a picture of that shade. I swapped it with my SIL when she was here for a visit. BTW, it looks fab on her!! Such a beautiful shade this Mauve1 is, I tell you! On another note, I bet you can take one look at the pic above and know how much love these products have received ;-)

You obviously don't need as many or the same products that I've used. You can recreate this look with products of your choice, add or take away some if u wish :-) For me, Makeup is all about having fun with colours & experimenting. It takes me away for sometime & I like that. Laugh it off if you will, but it's therapeutic in some ways ;-)

Hope you liked this simple "One-Toned" look. Do share your thoughts in the comments section below. Until the next post, Ciao!!!


Tuesday, July 5, 2016

Back on the Blog!

Hi Everyone,

How have you all been? It's been a while, right? :-) I'm back on the blog after what feels like ages. After a whirlwind 3 months, along came July & I realised that I'm missing blogging a bit too much. Mr. Husband knew the writer in me wanted to write but the "tech-dud" in me was horribly slow at typing on the Tablet. So he gifted this to me ---


A keyboard for me to 'type away to glory' lol ... ain't he a sweetheart? :-) Thank you Mr.Husband..! You rock...!! 


So here I am, with my very first post from our new home in Mangalore. The rains arrived here in June & it's pouring here today; but I'm feeling all bright & sunny thanks to my lil blog. Gosh, how I missed it!! And I missed you guys... Heartfelt thanks to all those of you who checked on me to see why I wasn't around; also to those who sent me messages saying they're missing my posts & asked me get back soon! 'Pakka promise' I'll be more regular on the blog henceforth.


If you follow me on Instagram, you already know that I've been posting way too many "LOTD - Lips of the Day" posts. Lol here are just SOME of them...


Lol :-P It's not just lipsticks but generally going through my stash & discovering "oldies but goodies" is my new thing.

Here are my social media details, in case you're interested :

Facebook : https://www.instagram.com/nehavinekar/
Instagram : https://www.instagram.com/nehavinekar/ (quite active here nowadays)
Twitter : https://mobile.twitter.com/nehavinekar
Snapchat : tld.neha

So stick around... wait & watch for what's coming up next!! Bye for now & catch y'all soon...


Tuesday, December 29, 2015

Quick & Easy Makeup Look (6 products only)

Hi Everyone,

I'm here to share a very simple look that I created today & ended up really liking it :-) The best part is that I used very few products for it. Multi-task with these & you're done in about 10 mins!! It's something that you can quickly put together when you're pressed for time. Here's the finished look & how you can go about it - 


1. Concealer & Pressed Powder
2. Black Kohl & Mascara
3. Bronzing Highlighter & Lipstick


1. Concealer & Pressed Powder - Skip the foundation or BB cream & use the concealer only where required. I used the Derma Color concealer & blended it on the T-Zone (Above & between brows, bridge of the nose, under eyes, cupid's bow & chin). Set the concealer with any pressed powder; I used the Rimmel Stay Matte powder for this step

2. Black Kohl & Mascara - Using your ring finger or an eye shadow brush, first apply the bronzing highlighter as an eye shadow all across your moving eyelid. This step will bring the light to your eyes & make the kohl (to follow) stand out! :-) I used the Revlon Highlighting palette in 030 Bronze Glow.

Using the kohl, line your waterline & lower lashline; remember to go slightly thick on the lower lashline. I used the Lotus ColorKick Kajal here. To ensure the kohl stays put, pick up the darkest shade from the bronzing palette on a pencil brush & use it to smudge the kohl on the lower lashline. Pick up more eyeshadow & repeat this if required as the eyeshadow will combine with kohl and hold it in place. The idea in this look is to skip using any liquid liner as it requires a certain amount of precision & time as well. Bring out the lower lashline with thickly lined kohl :-) Add 2 -3 coats of mascara to the lashes (I used the Maybelline Hypercurl Mascara) & later fill out the brows with the same kohl to complete the eyes (brows & mascara are optional steps!). 

I feel the thick kohl looks great from behind my glasses too & brings out my eyes... I wonder why 'silly me' completely forgot to click a picture with my glasses on .. **face palm** .. will put a pic up on my Instagram page soon... Follow me HERE.

3. Bronzing Highlighter & Lipstick - With a blush brush, apply the bronzer/highlighter to the apples of your cheeks & finish off the lips with your favourite shade of lipstick!! :-) I used the Sephora Color Lip Last lipstick in Meet My Pink (No.21).


This will most probably be my last post in 2015 :-) Before bidding goodbye to this year & stepping into the next one, I'd just like to say Thank-You for all the love & support you have shown to my lil blog. I started blogging just this year & I'm so overwhelmed to see the amount of appreciation that's been pouring in. It really means a lot to me!

For me, Makeup means 'Having Fun'! It makes me feel like a kid in an Arts & Crafts store. Makeup for me is about about playing around with colours, creating something new every time, being happy, creative & confident :-) Having said that, I'm confident even without a speck of Makeup on my face. So let's always remember, with or without Makeup - 

You are beautiful, You are YOU....Don't let anything change that :-) 

Have an amazing 2016!! Happy New Year!! 


Monday, December 28, 2015

Fall-inspired Party Makeup Look

Hi Everyone,

Today I'm here to share a quick makeup look that I created, inspired by the dull Greens & warm, autumnal Browns of Fall. I know there's no Fall in India, but let's just roll with it ;-)

Here's how I did it - 

1. Base - If you already don't know how I do this, then you MUST visit the blog more often..lol ;) After moisturizing my face, I applied the Lakme CC cream all over, concealed using Derma Color Concealer & set the base with Rimmel London Stay Matte powder.

2. Eyes - I used all of the colors on the right hand side of the Comfot Zone palette by Wet 'n' Wild. Dabbed the frosted green 'Eyelid' shade all over the eyelid & used the moss green 'Crease' shade in the outer corner of the eye to give it some depth. I used the 'Browbone' shade from the palette to highlight the area beneath the brows.


Then, I lined the upper lashline with Sugar 'Eye Told You So' eyeliner & the lower lash line with Lakme Eyeconic Blue kajal to offset the greens on the eyes. Finished the brows with my MUA eyebrow pencil in 'Brown'.


3. Cheeks - I used the 'Pearlescent Pink' blush by Wet 'n' Wild (which is a supposed dupe for the NARS Orgasm blush) & topped it off with the Wet 'n' Wild Rose Champagne Glow highlighter which I've been loving lately.


4. Lips - I mixed an old Oriflame pinkish lipliner with Maybelline Colorsensational 'Bronze Orange' lipstick which is quite a cult favourite when it comes to n*de lipsticks.

This look doesn't need the same products I've used & can be easily re-created if you have similar shades in your makeup stash :-) You could also create this look for your upcoming NewYear's bash!! 

Hope you liked this quick makeup look! :-) Let me know your thoughts in the comments section below.

Until the next post...Ciao!!

Tuesday, December 22, 2015

Makeup Revolution Baked Blush in 'Loved Me the Best' (Review)

Hi Everyone,

Today I'm going to share a quick review on the Makeup Revolution Baked Blush in 'Loved Me the Best'I picked this lil guy up from a blog sale along with a couple of other makeup items. I don't own too many blushes, but from the ones I own, I've been wearing this one very often this winter.


 'Loved Me the Best' has a beautiful blend of swirls of champagne, pink & berry tones. It's finely milled with medium pigmentation. On my oily/combination skin, this stays on for about 4hrs. If you prefer to layer powder blushes on top of cream ones then you'll surely get a longer wear-time out of this :-)

I prefer to wear this blush with deeper lipsticks. 'Loved Me the Best' seems to compliment deep pinks & red lipsticks better. The blush would suit light to medium skin tones however it wouldn't show up well on the rich, chocolate hues of dusky beauties & that's the only drawback of this blush that I can seem to point out. 


Have you tried out any Makeup Revolution blushes? Which ones are your favourites? Do let me know your thoughts & preferences.

Until the next post, Ciao...!!!


Friday, December 4, 2015

Berries & Blue Makeup Look

Hi Everyone,

With some extra responsibilities at home, I'm finding it slightly tricky to spend time blogging :-) So I've decided to write shorter, more concise posts for some time. Hope that's alright with all of you & hope you'll give these as much love, as the other more detailed posts!! Thank you :-)

Today, let's see how you can re-create this 'Berries & Blue' Makeup Look (don't judge me, I'm horrible at naming Makeup looks lol..!!) -


1. Face - Moisturize your face & dab on concealer where required. I applied Chambor Radiant Touch concealer on under-eyes, around the nose, chin & between the brows. Set this with a compact of your choice; I've used the Rimmel Stay Matte Powder. Your base makeup is in place!

2. Eyes - Line your eyes with kajal, any black kajal will do. A blue one, actually will work great! Now take a blue eye shadow on a smudger brush & smudge out the kajal. The eye shadow will stick on to the kajal & stay on for hours. I used the Lotus Herbal ColorKick Kajal & BeABombshell eye shadow quad that I had received in my Fab Bag. Next, fill in your brows if required. I have used the MakeUp Academy Brow pencil in Brown.

3. Lips - Use any deep berry shade on the lips. I've used MAC Fashion Revival lipstick for this look. It's a beautiful matte shade but I've topped it off with gloss, just for fun! :-) Other lipsticks that I have tried to pair up with blue eyes are - Lakme Creaseless lipstick in 'Wine Order' & Chambor Extreme Matte lipstick in 'Indulgent Bordeaux' .. these are wine & burgundy shades which also go very well with the eyes :-)

4. Optional - To balance out the bright eyes & deep berry on the lips, I used the Elf Contour & Highlight duo, which my friend Krupa from IshtyleAWhile passed on to me in a recent 'makep swap'. You can use a neutral blush like Maybelline Cheeky Glow in Creamy Cinnamon to do this. You can also skip this step if you wish, to make the eyes & lips stand out.

Products used in the look
It's a no-fuss, no-eye shadow look that you can create in a matter of minutes :-) Hope you liked this quick look that I created.

Until the next post, Ciao!!!


Saturday, October 17, 2015

October Fab Bag 2015 - Review

Hi Everyone,

I'm here to share my thoughts on the October FabBag today. I received this bag right in the beginning of this month, so I promise not to crib about 'delayed delivery' in this post ;-) Good Job Team FabBag!! As I've had my time to use these products & form an opinion, let's quickly get into the review...

Themed as "Get Set to Celebrate", this month I received a beautiful, ethnic looking bag in vibrant, truly-Indian colours! Pink & Red are totally apt for the festive season & I was happy to get yet another bag that can be actually used as a clutch for those special occasions when I choose to wear Indian outfits! Without any fuss of zips etc, this time the bag is shaped like a traditional pouch with a button and loop to fasten it shut. 


The very 'festive' October Fab Bag
1. Palladio Eye Shadow Quad in 'Blue Suede':
Tell me this isn't gorgeous! Come on, I dare you ;-) lol And the best part is, I got to choose it to be a part of my Fab Bag..!! This is the one product I honestly haven't touched as yet...its so beautiful, I'm afraid I'm gonna mess it up. Having used Palladio shadows before, I know for sure that they're decently pigmented & extremely easy to use. You need very little to create a vibrant look. Waiting to create an eye look with this baby & share with all of you! I feel I've been gravitating too much towards Blue this year (check out my Instagram account for different makeup looks - HERE), this time I want to try something different with this quad!


Palladio Eye Shadow Quad in 'Blue Suede'
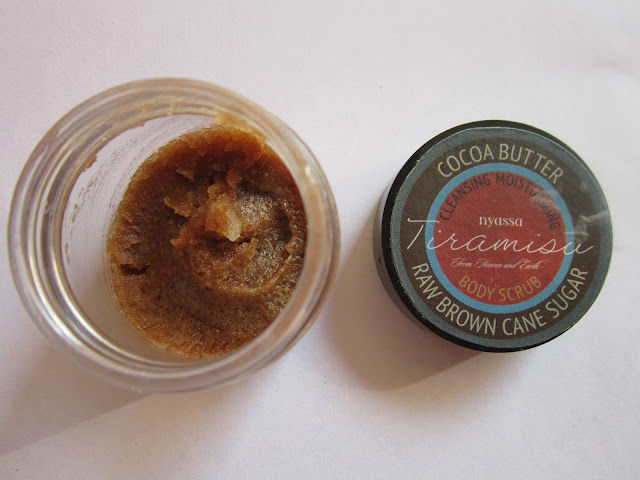
2. Nyassa Tiramisu Body Scrub:
Look at the little tub and you'd know if I liked this one or not ;-) LOVED it! If you love Chocolate or Coffee or Tiramisu, or ALL of them, you'd surely like this exotic scrub. It leaves the skin feeling nicely polished...exfoliated yet moisturized! Since it's finely granulated, it's gentle & not harsh like a walnut scrub is. One of my favs in this month's bag... I'm going to finish this sooon!! I hope I still have some left to use on 28th Oct, which is 'National Chocolate Day' BTW!! (did you know? I didn't!)


Nyassa Tiramisu Body Scrub
2. Palmer's Cocoa Butter Formula Lotion:
Palmer's is usually raved about & seems to have worked very well for a lot of people. I like it but its nothing to write home about (completely my opinion!!). It's particularly nice for my dry heels & elbows. It's slightly greasy to be used as an overall Body lotion & I'm currently using the Parachute Advansed Coconut Milk lotion which I'm quite happy with. For the face, I feel the Cocoa Butter Formula is going to be too greasy for my already-oily skin. I'm thinking of holding on to this one for the winter months; maybe I'll like it better then, dunno!!


Palmer's Cocoa Butter Formula Lotion
3. Spa Ceylon White Jasmine Facial Masque:
Another fav from this bag, the masque is great for quick 10-min pampering sessions. I find it slightly strange that its very thick in consistency for a masque; so much so that I can hardly pick it up with my fingers. I used a small spoon to dig into it just like you'd 'dig' into an ice-cream tub! Oooh Ice cream!!...no wait I'm getting distracted. Coming back to the masque, it cleanses & refreshes the skin throroughly. Although it leaves my skin a bit dry after I take it off, I don't worry too much because I use the Kama Ayurveda Rose Water Facial Mist to re-hydrate. Overall, I really like the masque & its lovely Jasmine fragrance!


Spa Ceylon White Jasmine Facial Masque
A slight bummer this month was that the Team sent only 4 products instead of the usual 5. Since they pampered us with the 3rd Anniversary September Fab Bag, I'd overlook that bit ;-) I really like this month's bag as well, I feel the Team's really upping their game month after month. Apart from sometimes sticking to the usual suspects, they're introducing new brands every month; this month they've brought us Spa Ceylon & Palmer's. Keep up the good work Team Fab Bag!!


Get Set to Celebrate!!
Hope you liked this review! Are you subscribed to Fab Bag? What were your favs from this month? Do leave me comments below.

Until the next post, Ciao!!!


Monday, September 7, 2015

Skincare Empties - August 2015

Hi Everyone,

I'm back with an 'Empties post' for the month of August. These are the products that I finished off (lol I sound like I killed the damn things!!) last month :-)


Let's begin by checking out each of the products and my thoughts on them. If you have used the same or similar products, let me know what you thought about them, in the comments section below :-)


1. Colorbar Acetone Free Nail Enamel Remover - Hehehe, technically NOT a skincare product, but I'm sneaking this one in. This product is really good to remove normal as well as glitter nail colours. If you have followed me on Instagram long enough, you know how much I love Maybelline Glittermania's Pink Champagne. This nail polish remover makes taking it off, a breeze. Same for any other glitter nail colours I wear. LOL random thought - I'm mommy to a 3yr old... are Glitter nail colours age-appropriate? ;-) dont answer that btw!!


2. Ponds Pure White Deep Cleansing Facial Foam - I made it national news (..almost!) when I discovered my love for Baby oil as a makeup remover (Read HERE). This face-wash removes all traces of residue baby oil & makeup. Also handy on days that I'm out of makeup remover & baby oil...yes, yes...guilty as charged! On such days, I wash my face with only this face-wash and sleep peacefully knowing my skin is clean.


3. Sand for Soapaholics After Glow Face Cleanser - This is a product I received in my May Fab Bag (Read HERE). It's nice but nothing great to write home about. This product actually got me curious about the brand & I bought their Mint Pedi Butter to try out as well. While that one's really great, this almond cleanser didnt make that great an impression on me.


4. Himalaya Purifying Neem Foaming Face Wash - It's not a surprise that we, as a family, love Himalaya products. We use their face washes, baby baths, face packs, etc. (lol, no we aren't sponsored, we just happen to like them a lot!). This was one of the many products that I really liked. Backup has already been bought ;-)


5. Johnson's Baby Shampoo - Read all about this multi-tasker HERE. I really like this shampoo to clean my makeup brushes, Tangle Teezer, etc....well ahem! apart from my boy's hair. It's just as gentle on everything else as it is on a baby's hair.


6. Himalaya Power Glow Licorice Face Wash - This one's hubby's fav. Unlike me, who loves to experiment, if he likes a product he will not even try anything else. Not so much into the fairness claim, he likes it for the oil-control properties that work well, without drying the skin, unlike the Lemon variant. Backup for this product is already in place ;-)

Have you 'finished off' (lol here I go again!) any products in August? What are your thoughts on them? Let me know in the comments section below. Hope you like these smaller, more concise 'Empties posts'.

Until the next post, Ciao!!!


Friday, August 28, 2015

August Fab Bag 2015 - Review

Hey Everyone,

I'm here today, to review the August Fab Bag for 2015. I received it a couple of days ago & I wanted to use the products a little before I gave your my actual opinions on them. So here we go -


The theme for the August Fab Bag is 'Cast a Spell' and hence the bag itself is a magical-looking, fairy-tale pink colour. It's shimmery all over with matte vines-like lines running across it. I really like the bag as it reminds me a lot of my all-time fav nail colour 'Pink Champagne' in the Glitter Mania range by Maybelline India.


The Fab Bag team has also launched a couple of new brands this month - Fran Wilson, Roots & Ital Veloce. Let's take a quick look at all the products in the bag & what I think of them -

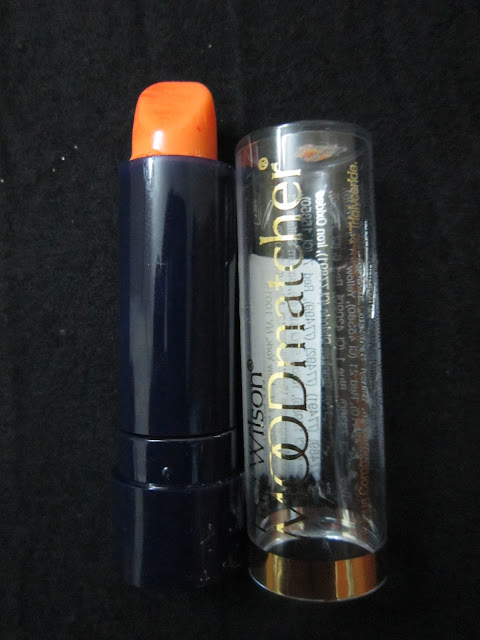
1. Fran Wilson Moodmatcher Lipstick in the shade 'Orange' -


Fran Wilson Moodmatcher Lipstick in 'Orange'
These kind of listicks are the current craze overseas. The formula reacts with your body-chemistry (body-heat basically!!) to transform in a hue/shade that matches you well. Although the shade I recived is called 'Orange', I was glad that the lipstick turned into a beautiful pink on my lips. The shade is sheer & looks like a lip-balm, but it stayed put all day, even after meals and water throughout the day :-) Thumbs-up for innovative products, Team!! I'm really loving this product for daily use.

2. Roots Professional Morocvita Oil -


Roots Professional Morocvita Oil
This lil piece of magic I really liked! I applied a couple of drops of the Morocvita Oil on towel-dried hair and combed it through. I was quite impressed with the results after my hair had dried. I can safely say that my hair was almost 50% less frizzy and sooo much more managable! :-) I just wish it smelled a lil more like Moroccan Argan Oil. The FX Moroccan Moisture Serum that I have been using for a past year and half smells amazing & I was hoping this oil smelt like that. The serum is really great at taming frizz too. But apart from the smell (sorry I should be calling it a 'fragrance; right? I dont know why I keep saying 'smell'..!!) this oil is just as awesome as my current serum!

3. Ital Veloce Fine Fragrance Mist in 'Sea Island Temptation' -


Ital Veloce Fragrance Mist in 'Sea Island Temptation'
I like the fragrance but would have liked it to remind me of the sea, waves, wind more than than the floral scent it gives off. Don't get me wrong, it's nice, really!! But when I read a name like 'Sea Island Temptation' I assume the fragrance is based on a "nautical theme" :-) I like those kind of scents...probably because Dad being in the Navy or I've sailed with my parents as a child, I like the scent of the sea or anything in that umbrella...you get the point! ;-) Overall its a good fragrance & since it's a mist, it only lasts for 2 - 3 hrs on me.

4. Divo Eyelash Curler -


Divo Eyelash Curler
I love eye makeup but never really ventured into the 'eye lash curler' arena. I have always wanted to try out one & this month, the team made this wish come true. I know I know, I could have just gone ahead & bought one, but I didnt, because I'm a worrier that way - what if my eye lashes come off, what if I pinch my lids by mistake, what if, what if? LOL No more excuses, I tried this and the curled lashes gave me a really nice look. I dont have lashes to boast about, but this lil guy curls them well & really opens up my eyes. Thanks to this curler, I took the next step...TADA...Mascara!! Having worn glasses all my life, I would just make do with eye liner, but thanks to Divo Eye lash curler, I am experimenting a lil more with eye-makeup.

5. Cuccio Nail Colour in 'Shaking my Morocco' -


Cuccio Nail Colour in 'Shaking my Morocco'
The team sent me an email to ask if if I'd like to co-curate the bag for myself. I was sent a link where I could pick a Cuccio Nail colour shade that I liked & that would be added to my bag. I craved for the delicious, bright Orange shade in the options given to me & here it is! It spells Summer for me & I know it's not really summer now, but this shade is sure to brighten up those dull, gloomy, rainy days.Well... and am I the only one who thinks that the name sounds a little naughty too haha!! ;-)

So overall, I give this month's bag, a very BIG Thumbs Up!! :-) I know this post is coming in very late this month, but here's hoping they 'up' their delivery game & send me the next month's bag sooner. 

Hope you liked this review. Let me know which were your favourite products from the Fab Bag this month? Do you have another subscription box that you receive and have loved? Leave your thoughts in the comments section below.

Until the next post, Ciao!!!


Friday, July 31, 2015

Skincare Empties - June & July 2015

Hi Everyone,

I'm here today to share an 'Empties' post. You must be wondering why I'd share an empties post with you, well here are a couple of reasons. 


get to tell you the products I finished, along with a quick opinion on each of them...well, just quick thoughts on whether I liked the product & if I will repurchase it in future. And more importantly, it's like a commitment I make to myself to use the products all the way through, not give up on them midway & report my thoughts to you ;-)


1. Himalaya Herbals Clarifying Mud Pack - Really nice for oily, acne-prone skin & those rare breakouts. Althouh I havent used this regularly (actually I should..) I use it on sudden breakouts and it dries them out within a day or two. I'll definitely repurchase this one.


2. Lakme Invisible Finish Foundation 04 - It says its water-based but this one had the sticky, foundation-ny feeling & I wasn't comfortable with it. I will not be re-purchasing this one. I've gotten pretty comfortable with my current CC cream so not really looking to change to foundation soon.


3. Lakme CC Cream in Bronze - Aah! Well, the pic says it all, I have gone throught almost 8-9 tubes of this from the time it released. I wish it came in more shades, but I like the Bronze shade of this cream, so I'm gonna stick to it :-) One of my favourites, will definitely repurchase.


4. Garnier BB Cream - I really like this one for daily use. It doesnt give much coverage but I like that it brightens up the skin for a fresh look. The lovely almond fragrance is a plus as well. I'm going to stick to Lakme CC Cream as of now; maybe I'll get this during summer next year.


5. Johnson's Baby Milk Cream - Yes, Yes, I'm a CHOR (thief) like that!! LOL My son's cream has made its way into my empties post cuz I love it for dry elbows and knees. And on rare occasions when my face feels dry and parched, this one's a saviour!


6. Loreal Paris Skin Perfect Cream (30+) - I'm not the one to go after 'whitening creams' but this one sparked an interest in me since it was customized for age groups - 20+, 30+ & 40+. It was nice, not a great cream that I'll jump and repurchase. The nice yet strong fragrance & the fact that it can sometimes leave a white cast on the face on humid days, put me off a bit. I'm glad I bought a small tube & managed to finish it :-)


7. Lotus Herbals Safe Sun Daily Sunblock with SPF 70PA++ - My constant companion during all those summer days, I finally finished this cream. I won't repurchase this one again but would definitely go for another version - the SPF 40 Tinted Sunscreen by Lotus. I can swap that one for any BB/CC Cream/Foundation on my face since it provides more coverage and remains matte throughout the day...things this SPF 70 guy sadly doesn't do :-)


8. Cuccio Naturale Hydrating Butter with Pomegranate and Fig - I loved this one! Yummy fragrance, extremely hydrating & .....freaking expensive!! LOL... Read my thoughts on this lil guy, I got as a sample in one of my fab bags - HERE.

Hope you all liked this new post. Would you like me to continue doing such posts in future? What did you finish off this June & July? What's your opinion on some of these products? Let me know your thoughts in the comments section below...

Until next time, Ciao!!!